How to crop and resize images for your website
When adding images to your website, it is important to upload a properly sized image to fit the need. It's not just about the visual display (although, that can be an issue, too), but improperly sized images can have an adverse effect on your site's page speed. That, in turn, can hurt your search engine rankings.
For example, you may want to include a headshot on your about page. If you take a photo with your phone and upload it, that image is going to 10 or 20 times too big for what's needed on the website. While your theme might be smart enough to shrink the image down so it doesn't take up the whole screen, it's likely that the large image is still being loaded and then squished down to fit the available space. Again, this is an SEO issue.
So, before you add any images to your website, take a few minutes to resize and crop them to a reasonable size for where they'll be displayed on your website. And, if you aren't' sure how to do that, read on!
Image Editing Tools
In the past, if you wanted to edit images, you needed software like Photoshop. For most people, Photoshop is too expensive and is overkill for their needs. Thankfully, there are now much less expensive desktop software options like Pixelmator Pro (that's what I use) and even free options like Gimp (although, not nearly as slick and user friendly).
But, for somebody who doesn't need to edit images very often, there is a terrific online resource that I like to recommend; Pixlr. That's what we'll use in this quick tutorial.
Cropping and Resizing an image using Pixlr
In this tutorial, I'm going to do the following:
- Downloaded an image from pixabay.com at an original image size of 1920×1280 pixels
- Open the image in Pixlr
- Crop a square portion of the image to use as a headshot
- Resize the image to 500×500 pixels
Let's get started.
Step 1:
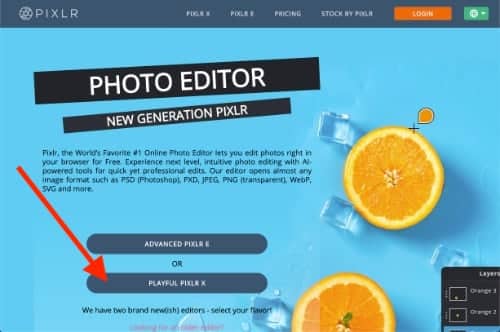
Visit pixlr.com and click the ‘Playful Pixlr X' button.
Pixlr's free version is ad supported. If you don't mind the ads, there's no need for you to sign up for an account. Paid accounts have additional functionality and the ads are removed as well. For our purpose today, I will be using the free service.
Step 2:
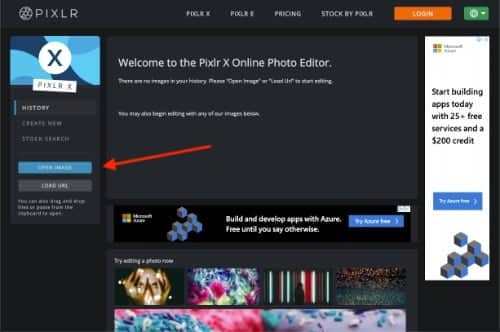
Click the ‘Open Image” button to browse your computer and upload the image you want to edit.
Step 3:
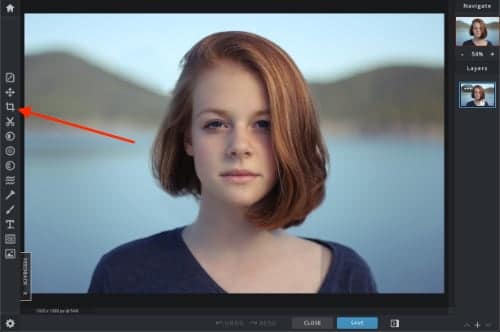
Click the ‘Crop' icon, 3rd icon on the left, to open the crop tool.
Step 4:
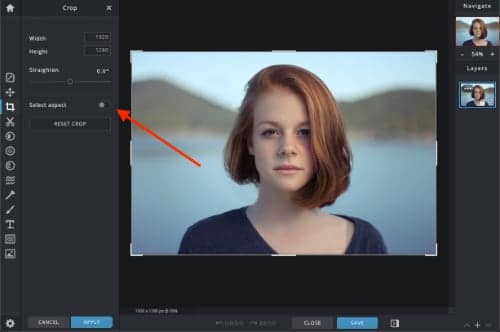
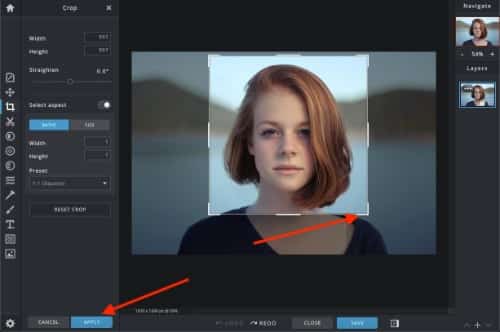
Since we plan to use a square image, we're going to click the ‘Select Aspect' toggle. There are a number of preset aspect ratios to choose from, including some handy ones for social media image sizes. we will be using the 1:1 (Square) aspect ratio.
Step 5:
Once you click the 1:1 (Square) aspect ratio, the selection box on the left will snap into a square. You can click on any of the corners of the selection box and drag it to resize the box. You can also click and drag the entire box to properly position it to select the content you want in your photo. Once you have the desired selection, click the “Apply” button at the bottom.
Step 6:
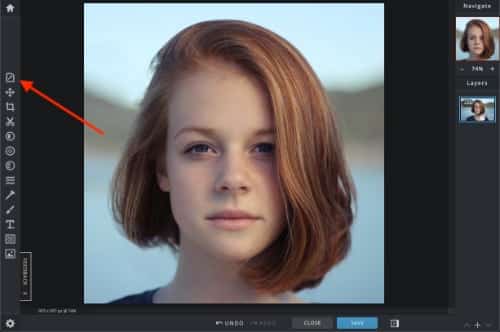
Now that our image is cropped into a square, we're ready to resize it. To start, click the ‘Properties' button, the top icon on the left. Then click the ‘Resize Image' button.
Step 7:
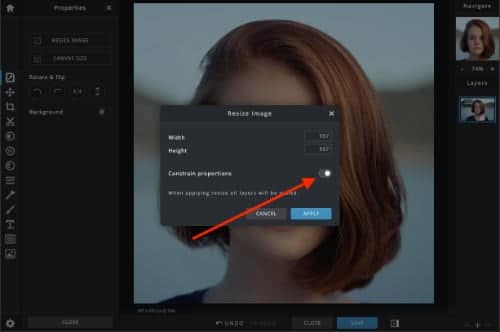
Because we want to make sure that our image maintains the same aspect ration when we resize our image, start by ensuring that the “Constrain proportions” toggle is turned on before using the boxes above to type in ‘500' for the width. As you type your number in the width box, the height box should update automatically to match. Finish by clicking ‘Apply' to resize the image.
Step 8:
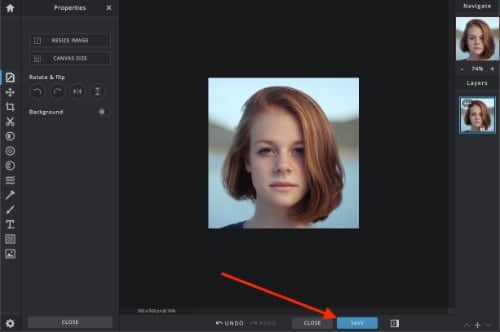
Excellent, your image has been cropped and resized. Click the ‘Save' button to open the save dialog box.
Step 9:
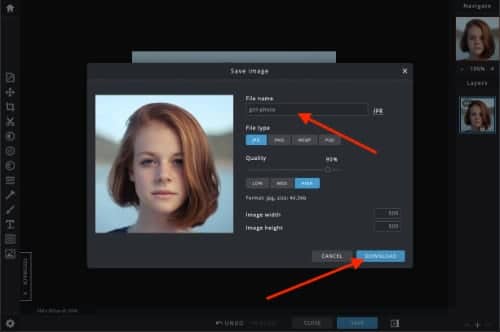
The ‘Save Image' dialog box has a number of options that we aren't going to cover at this time. For now, simply type in the new name for your image, select ‘jpg' as the File Type, leave the Quality at either 90% or 100%, then click the Download button to save your image.
Look at the savings!
Now that you have cropped and resized your image, you are ready to upload and use the image on your website. But you may be asking yourself, was it worth your time to take these steps? If you downloaded an image from your existing website, ran it through the steps above and then replaced it in the same spot on your site as before, it's possible that you may not even notice a visible difference. So again, was it worth your time? Let's look at file sizes.
When I first downloaded the image from Pixabay, it's file size was 204kb. This actually isn't terrible for an image that was 1920×1280 pixels in size.
After cropping and resizing and saving at 90% quality, the file size dropped to 41kb. That's a 5x savings for a single image. Now imagine you do that for a page with 10 or 20 images on it. It's easy to see how you can drastically reduce your page size with this simple step.
Do you have images that need to go on a diet?
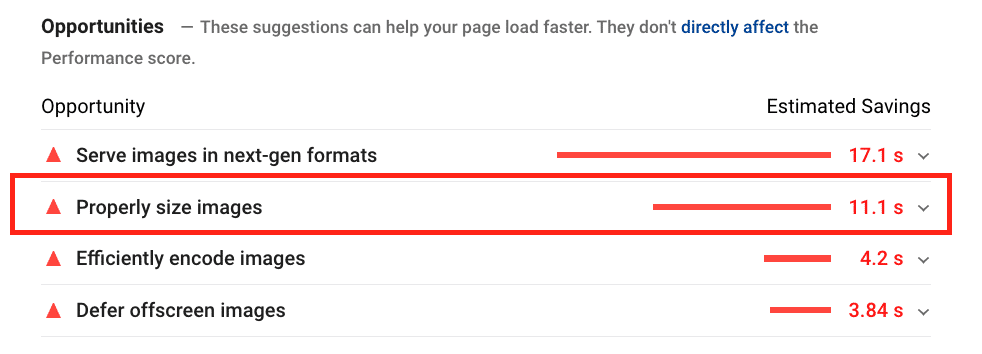
If you are looking for an easy way to see if your website could benefit from resizing some images, run your website through the PageSpeed Insights tool from Google. In the “Opportunities” section, look for a line item called “Properly size images”. If you see it, click the down arrow and google will show you exactly which of your images need resizing.
Your page speed, and your visitors, will thank you
Many of us don't even realize that images we're uploading are so much larger than they need to be. That partly has to do with high-speed internet in our homes and offices. If an image is an extra 100kb or 200kb, we won't even notice it. But Google will. Google sees all, remember.
Google, rightly so, thinks page speed is hugely important. And so do your visitors who may be browsing your site on a flip-phone from the middle of nowhere with crappy internet access. Keep that in mind the next time you add an image to your website.

